Today I needed to enable a Charles proxy on my Windows PC. Later I have managed the Genymotion virtual device to be monitored by the Charles proxy.
1. Download OpenSSL binaries
I have gotten an OpenSSL Win64 binary (Win32 is available too) on my Win 64bit machine (source). Alternatively you might download and unzip an OpenSSL library from here.
Now I have my project in C:\OpenSSL-Win64, the executable openssl.exe located in C:\OpenSSL-Win64\bin
2. Executive Config file
Config file is here – C:\OpenSSL-Win64\openssl.cnf
3. Charles CA cert
C:\OpenSSL-Win64\bin>mkdir CharlesCA
C:\OpenSSL-Win64\bin>cd CharlesCA
Let’s copy openssl.exe and openssl.cnf from bin folder into bin\CharlesCA folder.
C:\OpenSSL-Win64\bin>copy openssl.cnf CharlesCA\openssl.cnf
C:\OpenSSL-Win64\bin>copy openssl.exe CharlesCA\openssl.exe
Now we can proceed to make the certificate:
C:\OpenSSL-Win64\bin\CharlesCA>mkdir certs private newcert
C:\OpenSSL-Win64\bin\CharlesCA>echo 01 > serial
C:\OpenSSL-Win64\bin\CharlesCA>echo $null >> index.txt
C:\OpenSSL-Win64\bin\CharlesCA>openssl.exe req -new -x509 -days 3650 -extensions v3_ca -keyout private/ca_key.pem -out certs/ca_cert.pem -config openssl.cnf
3.1 Output:
Generating a 2048 bit RSA private key

..............................................................................................................

..............................................................................................................

....+++

.......+++

writing new private key to 'private/ca_key.pem'
and a prompt for a passphrase that you need to enter follows:
Enter PEM pass phrase:
(Charles proxy will ask for this passphrase when it needs to)
3.2 Additional info
Following that, you’ll be asked to enter information that will be incorporated into your certificate request:
-----
Country Name (2 letter code) [AU]:
State or Province Name (full name) [Some-State]:
Locality Name (eg, city) []:
Organization Name (eg, company) [Internet Widgits Pty Ltd]: scraping.pro
Organizational Unit Name (eg, section) []:scraping.pro
Common Name (e.g. server FQDN or YOUR name) []:igor
Email Address []:xxx.xxx@mail.com
Now our key is at C:\OpenSSL-Win64\bin\CharlesCA\ca_key.pem
4. PKCS12 format
Next we are going to run a command to generate the PKCS12 format that Charles expects.
C:\OpenSSL-Win64\bin\CharlesCA>openssl.exe pkcs12 -export -out ca_cert.pfx -inkey private/ca_key.pem -in cert/ca_cert.pem
For the following prompts, you enter some arbitrary phrases and passwords (they might be empty)
Output:
Enter pass phrase for private/ca_key.pem:

Enter Export Password:

Verifying - Enter Export Password:

unable to write 'random state'
From this process, we get the following files:
ca_cert.pfx – this is where we need to point Charles.
ca_cert.pem – this is the CA certificate to add to clients
ca_key.pem – this is the key (keep this safe).
5. Set key to Charles
Now that we have this, we need to point Charles to the ca_cert.pfx, the CA cert we just generated. When we do this, Charles will ask for the passphrase (from point 3.1).
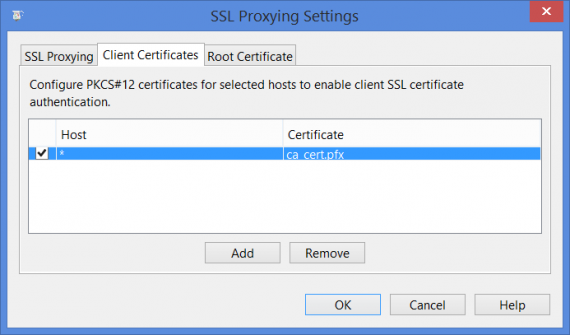
In the Charles Proxy app, you go to the main menu Proxy->SSL Proxying settings. Then you choose Client Certificates and press Add button to load ca_cert.pfx file.

Using Genymotion With Charles Proxy
Eventually all the previous actions were needed to be able to use CA certificates in my PC virtual device. Here we apply it to the Genymotion Android emulator.
1. Copy cert to a virtual device
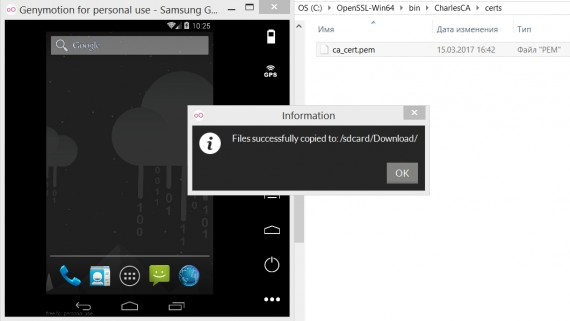
Now we copy the certificate into a running virtual device instance. Drag-&-drop it from cert\ca_cert.pem into the running virtual device:
2. Configure Genymotion’s virtual device for Charles proxy
In the Genymotion’s virtual device:
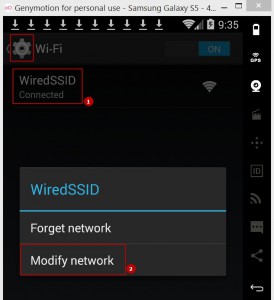
- Go to Settings -> Wifi -> Press and hold your active wifi network.
- Select Modify Network

- Select Show Advanced Options
- Select Proxy Settings -> Manual
- Set your Proxy to: 10.0.3.2 (Genymotion’s special code for the local workstation)
- Set your Port to: 8888
- Save the setting
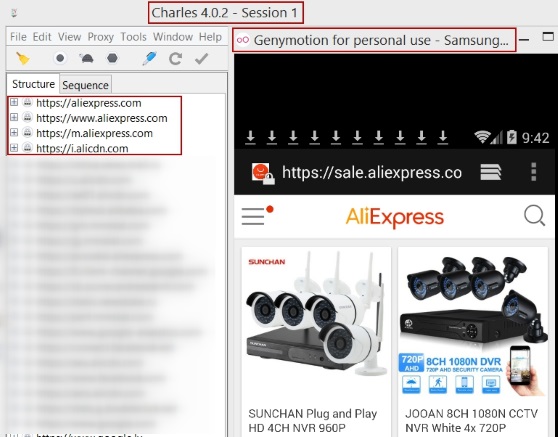
Now the traffic of the virtual device will be monitored through the Charles proxy:

